Omniture Documentation
What is omniture?
Wikipedia defines it as an online marketing and web analytics business unit in Orem, Utah, acquired by Adobe Systems in 2009. In simplistic terms, it is an interface to view usage statistics across a product, based on collected data.
Why omniture?
It has a number of advantages over a lot of other analytics. A few of which would be

Scalability : You can install omniture on the biggest website in the entire world and it can handle it.
Customizable : With some amount of expertise you can pretty much do anything. Get information at minute level, create custom variables etc. It's a platform that allows you to design itself.
Integration of "discover" : You can customise the reports by dragging and dropping widgets, segments, dimensions etc. which is possible only through omniture.
Lots of compatible softwares : One such software is DTM which is again owned by Adobe, used to create rules to help with site-side configuration.
Use as a Business Intelligence tool : You can use Omniture to create dashboards, reports and widgets that can be shared across the organisation for business purpose.
Omniture v/s Google Analytics
Omniture provides a much more robust pathing reporting than GA, including the ability to path by page group (e.g., Listings Page, My Listings, Edit Listing Attributes, Submit edited listing details).
Omniture SiteCatalyst provides real time data and the level of detail you can obtain in your reports is far superior to Google's offering.
The downside would be that, to get to a lot of the power of Omniture, you have to do site-side configuration of the page tagging.
Omniture Basics
Tracking on omniture is controlled by a set of Site Catalyst variables called "eVar", "prop" and "event". For a deeper understanding of each one of these, let's look at their definitions.
eVar
- eVars are called conversion variables and are generally set on different pages.
- They are generally used to tie success events back to the last value that was stored in the eVar.
- eVars are persistent and can be controlled, through admin as to how long they remain persistent (visit or time frame, or when a success event is fired) and how to allocate a success event to them (most recent value is the most common setting).
prop
- Props are custom traffic variables.
- They are used to count the number of times certain values were sent into Site Catalyst.
- Traffic data includes Visits, Visitors, Unique visitors, Page Views, Sections, Sub-sections, Internal search terms, user type (segments). One may also enable pathing on these custom variables to figure out the path that user takes from prop to prop.
- They are not persistent, meaning - once they get tracked into Site Catalyst, they are forgotten.
events
- Events are completed visitor actions on a website.
- Unlike traffic variables which serve as dimensions or breakdowns of a Page View/Visit/Unique Visitor metric, Success Events are always numbers.
Tabular representation of the differences between Site Catalyst variables
| Factors | Conversion Variables (eVars) | Traffic Variables (Props) | Success Events (Events) |
|---|---|---|---|
| Purpose | Traffic Counters | Conversion Segmentation | Conversion Metrics |
| Function | Non-persistent, Pathing, segmentation | Persistent, Merchandizing | Counter, Numeric currency |
| Metrics | Page Views, Visits, Visitor Time Spent | Success Events, Visitors, Visits |
Configuration
There are multiple ways to configure Omniture tracking for a particular site. One of the approaches adopted for tracking Seller Dashboard page views and events is a combination of DTM and site-side configuration.
As discussed in the advantages above, omniture is compatible with a number of tools, one among which is DTM (dynamic tag management) tool owned by Adobe.
The approach is to set the required values through a globally exposed object and fire omniture event from Seller Dashboard to enable tracking.
DTM Configuration
Dynamic Tag Management (https://dtm.adobe.com) provides an interface to create and publish events which can be consumed with a right mapping during site-side configuration.
As per Adobe's official documentation "Dynamic tag management provides digital marketers tremendous flexibility and control to implement and optimize digital experiences while reducing IT dependence—allowing marketers to focus on marketing, rather than tags. Dynamic tag management not only solves standard tag management problems, such as code deployment, data management, and rule building, but also provides an intuitive capability that maps directly to marketing scenarios and user experiences."
Why DTM approach ?
Dynamic tag management provides the following benefits:
• Improved Site Speed: Optimize loading of multiple analytics and marketing tags, proven to slow page loads. Dynamic Tag Management Overview 9 • Quicker Implementations: Significantly reduce deployment time.
• Increased Efficiencies: Reclaim substantial amounts of time spent managing analytics and media tags.
• Control and Security: Develop and deploy tag strategies by collaborating with marketing, analysts, and IT to recommend, test, and deploy tags within protocols and across systems all within the capability.
• Enhanced Flexibility: Quickly test and optimize tags without being bound by release cycles.
• Centralized Tool Management: Trigger many tags and technologies simultaneously, rather than creating separate rules for each one.
• Reduced Costs: Minimize the need to use JavaScript-trained IT resources for tag management activities.
Key features of DTM:
• Unmatched rule-driven data collection
• Site-centric rather than tag-centric user interface
• Robust process and workflow management
• Lightweight, meta-based library
• Ability to host anywhere
• Built-in collaborative tools
• Management of multiple sites
As in the image below, DTM allows rules to be configured, once the conversion/traffic variables and events are assigned for tracking a certain event. There are basically 3 different approaches for creating a rule. In this case Flipkart Seller is the web property.

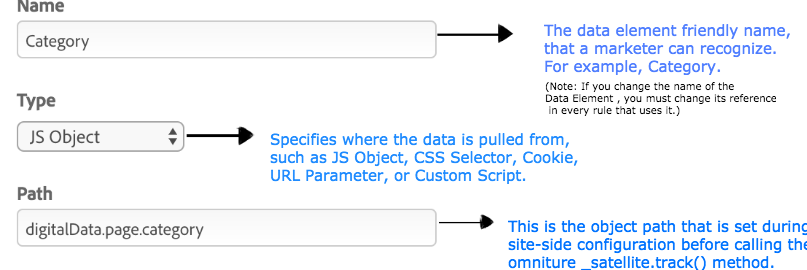
One of the key features of Adobe Analytics' DTM configuration is the creation of a Data Element. Before we can understand the types of rules, let's understand what is a data element,
Data Element can be understood as a temporary variable that holds the value of eVar/Prop before it can be pushed into omniture under a specified Site Catalyst variable. Now, let's see how we can create one.
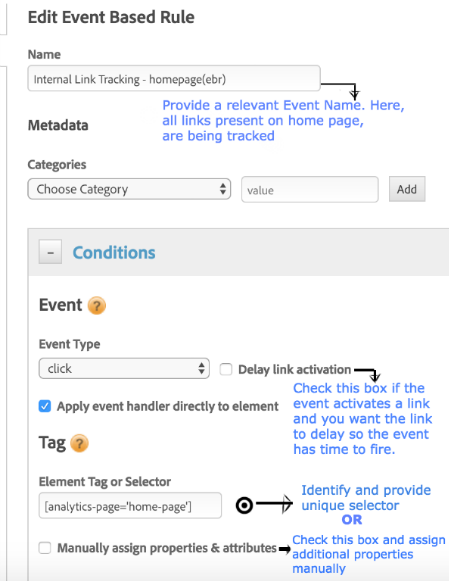
- Event Based Rules : This approach can be used in cases where no dynamic data is supposed to be tracked i.e., when a browser event is fired. This is suitable for tracking link clicks that redirect to a new page. Below image explains the fields and their significance while create an EBR.
Select the type of interaction you want to track, such as mouse clicks, or submitting a form. Provide the selector leveraging CSS selector syntax.
Handle event bubbling and provide your preference regarding the same using the options provided as shown below. Use the additional options to bind extra conditions to the rule.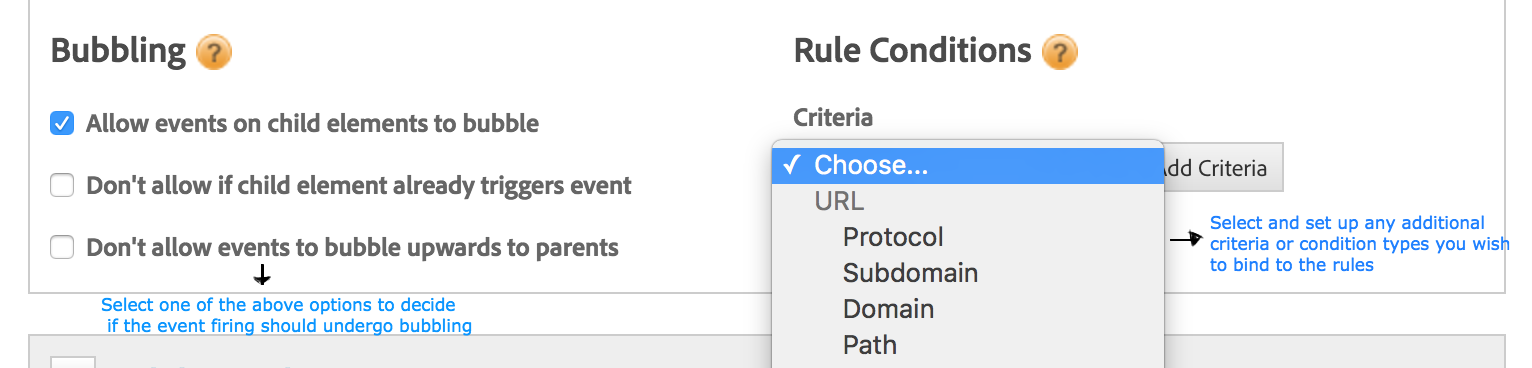
2. Page Load Rules : Specify where on the page you want the rule to trigger. The timing of where the rule fires on the page becomes more important when there are dependencies on page content within the rule.
Also, specify the condition that causes the rule to fire. For example, you can selectPathto identify specific pages for which you want the rule to fire.

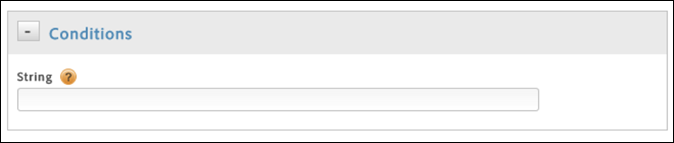
Direct call Rules : Here, we specify a unique string identifier that is passed to _satellite.track() method of omniture.
Set up actions for conditions to trigger :
Once one of the above event's conditions are set we need to couple the event and it's values to the site catalyst variables. This is done under the "Adobe Analytics" tab.
As in the screenshot below, once an eVar is selected, the successive input field provides a list of data elements to select from.

eVar50 has been assigned to Notification ID, eVar32 can be assigned to any data element, typing "%" followed by a required data element name provides a dropdown list to select from as shown.
Similarly, Props and events are set specific to the rule.

 The Adobe Analytics section also provides an open editor to write custom code in order to handle the site catalyst variables efficiently and hence be able to use them judiciously. For a toggle case for example, in cases where we need two events to be fired on click of say a Yes and No button, we can simply create a data element and use the variable name to check for the value before firing the event. Here is one such example.
s.linkTrackVars="events";
s.linkTrackEvents="event126,event127";
if(_satellite.getVar('isOptInTncAccept') != "")
{
       if(_satellite.getVar('isOptInTncAccept') === 'True')
       {
              s.events='event126';
       }
       else if(_satellite.getVar('isOptInTncAccept') === 'False')
       {
              s.events='event127';
       }
       s.events=s.apl(s.events,',',1);
}
linkTrackVars and linkTrackEvents are used for defining eVars/props and events respectively. "isOptInTncAccept" is a data element whose value is being checked to fire event126 if it is 'True' and event127 if it is 'False'.
Omniture and DTM are connected through report suites. Once a rule is saved, it becomes available in dev report suite. In order to push the same to production the rule needs to be approved from the approval tab and Queue needs to be published from the overview tab. Doing this updates the DTM script with the newly configured changes
Site-side Configuration
Once the DTM rule is configured using one of the above ways, a code snippet needs to be invoked from the client to make a server request to omniture to push data being transmitted from the site. Considering that we have used only two ways on Seller Dashboard so far to enable omniture, we would be discussing SD configuration for "Event-based" and "Direct Call" rules.
DTM script needs to be included in the head. Recommended to import the script dynamically so that environment specific scripts are loaded, also configuration can be updated easily whenever script path needs a change.
Let us look at how Site-side configuration can be done for Event-based and Direct call rules.
Event-based Rule: This requires the right CSS selectors and corresponding tracking data to be set on the link or tag that we are attaching Event-based rule on. Let's consider an example:
Consider that we want to track the links in the image below, we will need to first assign Site-Catalyst variables for the same. Let's use eVar22, prop22, event44 as the site catalyst variables.
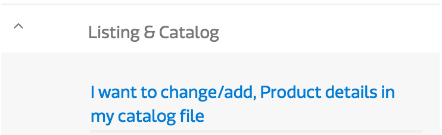
The tags for the links look as follows
<a class="link link-item-primary"> {{firstLevelItem}} </a> <!--- for element with text "Listing & Catalog" --->
AND
<a class="link link-item-secondary "> {{firstLevelItem}} </a> <!--- for element with text "I want to change/add, Product details in my catalog file" --->
Let's set up Event-based rule fields on the first element
1. Name : Internal Link Tracking-Seller support
2. Conditions:
- Event Type : Click,
- Element Tag or Selector :_ [analytics-page = 'seller-support'],
- Bubbling: Don't allow events to bubble upwards to parent : checked
3. Adobe Analytics
- eVar22 : %this.getAttribute(analytics-label)%
- prop22 : %this.getAttribute(analytics-label)% (Duplicated from eVar22)
- event44
In this scenario, the above tag will need to have the following structure.
<a class="link link-item-primary" analytics-page='seller-support' analytics-label='Seller Support : Ask For Assistance : Listing & Catalog'> {{firstLevelItem}} </a >
<a class="link link-item-primary" analytics-page='seller-support' analytics-label='Seller Support : Ask For Assistance : Listing & Catalog'> {{firstLevelItem}} </a>
Note: The above case of internal link click tracking has been handled on SD in a generic manner by reusing evar22, prop22 and event 44 for tracking all link clicks across the dashboard.
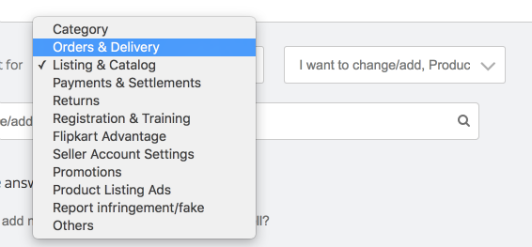
Direct Call Rule: Direct call rule could be used when the data to be pushed to omniture is being dynamically generated. For example, in the screenshot attached, selectBox is a reusable module and hence no page specific attributes can be added. But change in the Assistance category needs to be tracked.
In this case, we listen to the event emitted on change of selected option, and push to omniture.
Like for GA, Snoopy, Kiss metrics we have a plugin created for omniture (omniAnalytics.js), that uses two properties passed to analytics.track method for invoking omniture's tracking method (_satellite.track).
We set an Object globally (digitalData) and call _satellite.track to which we pass the unique string using which we have configured the DTM rule.
Consider that the unique string is "track_ss_category_filter_change", data element for holding the category value has path "digitalData.filter.ss.category". We simply need to do the following (where analyticsHelper is the promise returned on importing analytics.js plugin)
analyticsHelper.track({
    digitalData: {
        filter: {
            ss: filterValue
        }
    }
    event: "track_ss_category_filter_change"
})
Also, since some verticals are using Angular, we also have a plugin in angular and is included inside dtmCommon.js. Including this in the script and invoking window.fk_omniAnalytics.track should do the same as the event based configuration for blinx.
Once the Configuration is done, browser level testing can be done by applying filter b/ss in the network tab and looking for the variables mapped as the following in request headers eVar22 - c22, prop - v22, events - event44
References
Understand the difference between eVars and Props https://marketing.adobe.com/resources/help/en_US/sc/implement/props_vs_eVars.html
Success Events https://marketing.adobe.com/resources/help/en_US/reference/success_event.html
Documentation on DTM https://marketing.adobe.com/resources/help/en_US/dtm/ https://marketing.adobe.com/resources/help/en_US/dtm/analytics_dtm.html